A guide of suggestions to help
you in your service position
This guide was composed using Zoom version 5.4.7 on Windows 10. Newer versions may look differently from what’s shown here. We will try and keep this updated as Zoom makes changes. Also, the Mac client should be almost identical but there may be slight differences.
You must be on a computer using a desktop operating system like Microsoft Windows or macOS to use this guide. Mobile operating systems are not covered here nor are they recommended for Zoom Tech duties.
NOTE: Chromebooks are not suited for Zoom Tech hosting duties! The ChromeOS version of Zoom is feature-incomplete and lacks certain critical functions such as the ability to assign hosting priviledges to another user, for example. Please use only Windows and macOS versions of Zoom for Zoom Tech hosting.
To begin, let’s setup your computer so you are optimally ready to serve the meeting. You must be on a PC or Mac in order to perform all duties of being Zoom Tech. Using an iOS device like an iPad or iPhone is not recommended.
NOTE: Chromebooks are not suited for Zoom Tech hosting duties! The ChromeOS version of Zoom is feature-incomplete and lacks certain critical functions such as the ability to assign hosting priviledges to another user, for example. Please use only Windows and macOS versions of Zoom for Zoom Tech hosting.
If you haven’t already downloaded the latest version of Zoom, download and install it now. As of 1/2/2021 the latest version is 5.4.7. Once installed, login to the Intergroup Zoom Account and then proceed with the rest of this section.
Open the settings panel by clicking on the gear icon in the upper right-hand side of the main Zoom window.

Once in Settings, click on General in the left pane. If you are using dual-monitors (which I highly recommend) checkmark the “Use dual monitors” option which will display the Spotlighted video in a separate floating window that you can move to your 2nd monitor if you wish. It’s a nice way to keep the gallery view visible (which is important to spot potential problems as they arise) and also see who is speaking enlarged. This will also enable you to pin videos to both monitors simaltaneously if you so choose.
Next, checkmark “Always show meeting controls” so they don’t disappear on you when you stop moving the mouse. Finally make sure “Ask me to confirm when I leave a meeting” is checked. This is super important as you don’t want an accidental click to end the whole meeting for everyone.

Next, click the “Video” section in the left pane. On the right, scroll down and locate the “Always display participant names on their video” checkmark and make sure it’s checked. This will never hide the names of participants in gallery view which helps you as Zoom Tech to locate people quickly incase a problem arises.
Next uncheck “Hide non-video participants.” This ensures even people with their cameras off will still be displayed in the gallery view grid. Zoom bombers particuarly like to keep their cameras off until they are ready to bomb and so being able to keep on eye on even people without a camera running is best-practice.
Finally, if your computer supports 49 participants visible at once on your screen, select this function as it will mean you have a greater view of everyone in the meeting at once. Some older laptops with integrated graphics cards can’t support 49.

Finished with Video, lets move to “Screen Sharing.” Mark sure the “Silence system notifications when sharing desktop” is checkmarked as this will limit popup interruptions while you’re sharing the screen. I like to mitigate as much risk as possible when serving as Zoom Tech so the focus remains on the meeting and the proper content that needs shared and nothing else.
Next under the “Share applications” subheading, select the “Share individual window” radio button so you can share, for example, an individual browser window instead of your whole screen. Again, mitigation of risk.
Finally, under the “When I share my screen in a meeting” subheading, select the “Show all sharing options” radio button. This will popup the Share Screening dialog window to allow you to select the proper window or screen to share.

Zoom Techs must sign out of their personal Zoom accounts and into the shared DCCMA Intergroup Zoom account. Be aware, if someone else is signed in at the same time as you are logging on, they will be booted off the system. Only one login instance is allowed per account on the Zoom platform.
Step 1. Log out of your personal Zoom account. This can be done by clicking your profile photo in the top-right corner of the Zoom window and clicking Sign Out.
Step 2. Sign-in using the DCCMA Intergroup Zoom Account, credentials are found on our Intergroup Zoom Accounts page.
DC CMA Intergroup has setup reoccurring meetings that are ready to launch at their respective times and days. This makes it super easy for our Zoom Techs to just sign in using the main account and launch meetings.
To start a meeting, in the main Zoom window, select the Meetings icon at the top and then to the left there is a pane with the various reoccurring meetings. Select the meeting you wish to start and then to the right click Start. The meeting will now begin with you as the host. It’s that simple.

One of the Zoom Tech’s primary functions is the security of the meeting environment from intruders, or in Zoom parlance “bombers.” The first thing I do after starting a meeting is double check the security parameters to ensure I have a grasp on what guests can expect when they join and to thwart any would-be attackers.
In the Zoom meeting window, locate and click on the Security shield at the bottom. In the menu that appears, you will see a list of items. At the top, make sure the “Lock Meeting” is unchecked as this will allow guests to begin entering the waiting room when they logon. Next make sure the “Enable Waiting Room” option is checkmarked. This will ensure bombers can’t freely enter the room without your consent. Next, in “Allow participants to:” make sure “Share Screen” is unchecked. We don’t want non-hosts being able to blast any content from their screens to the whole room. Typically the rest on the list I leave checkmarked like the ability to for guests to chat, rename themselves, unmute and start their videos.

The final thing to note is the red-lettered “Suspend Participant Activities” option at the bottom. This is a powerful new security feature that gives the host a one-click ability to halt any would-be bombers from wreaking havok in the meeting. When activated, this turns off all participants videos and microphones, disables the chat function, turns off screen sharing, prevents users from renaming themselves, hides profile photos and finally locks the meeting. When a bombing occurs, activating this is the surest* way to put a stop to the unwanted behavior.
Of note, once you clear the bomber(s) from the room, be sure to reactivate the various functions listed under “Allow participants to:” so that people can turn their cameras, mics, etc back on and continue the meeting. Also turn off the Lock Meeting function so new users can join the room. If the bombing persists, leave Lock Meeting enabled to ensure the security of the meeting.
See our Zoom Bombing page for suggested step-by-step procedures when a bombing happens. It can be a very stressful thing for a Zoom Tech to deal with but thankfully, we have great tools at our disposal today to deal with these issues when they arise.
Finally, the last thing to cover under security is the green shield icon at the top left corner of the meeting window. Clicking this will reveal the various pieces of information about the meeting like the meeting ID number, who the host is, the passcode assigned to the meeting, a numeric passcode for telephone callers, an invitation link you can send to people who need it, and if the meeting is encrypted. If someone asks what the meeting code is, simply copy and paste from this menu.
Now that we have started the meeting and reviewed the security settings, it’s time to begin admitting people to the meeting. With the default Waiting Room function enabled, when people click the link to join our meeting, they will be placed in a temporary waiting area until the Zoom Tech admits them to the meeting. When this occurs, you will see a popup appear at the top of your main meeting window notifying you that someone is waiting for approval. Please note, if you have the participants window open this notification changes to the Participants window instead of the main window. You will still hear a chime when they enter which helps bring your attention to their arrival.
You will now have the option to Approve their entry into the meeting by simply clicking Approve. You can also Remove them from the meeting here which will bar their re-entry. Finally, you have the option to chat with those in the waiting room if you wish by using the chat window. (More on that in the section entitled Participants and Chat Windows)
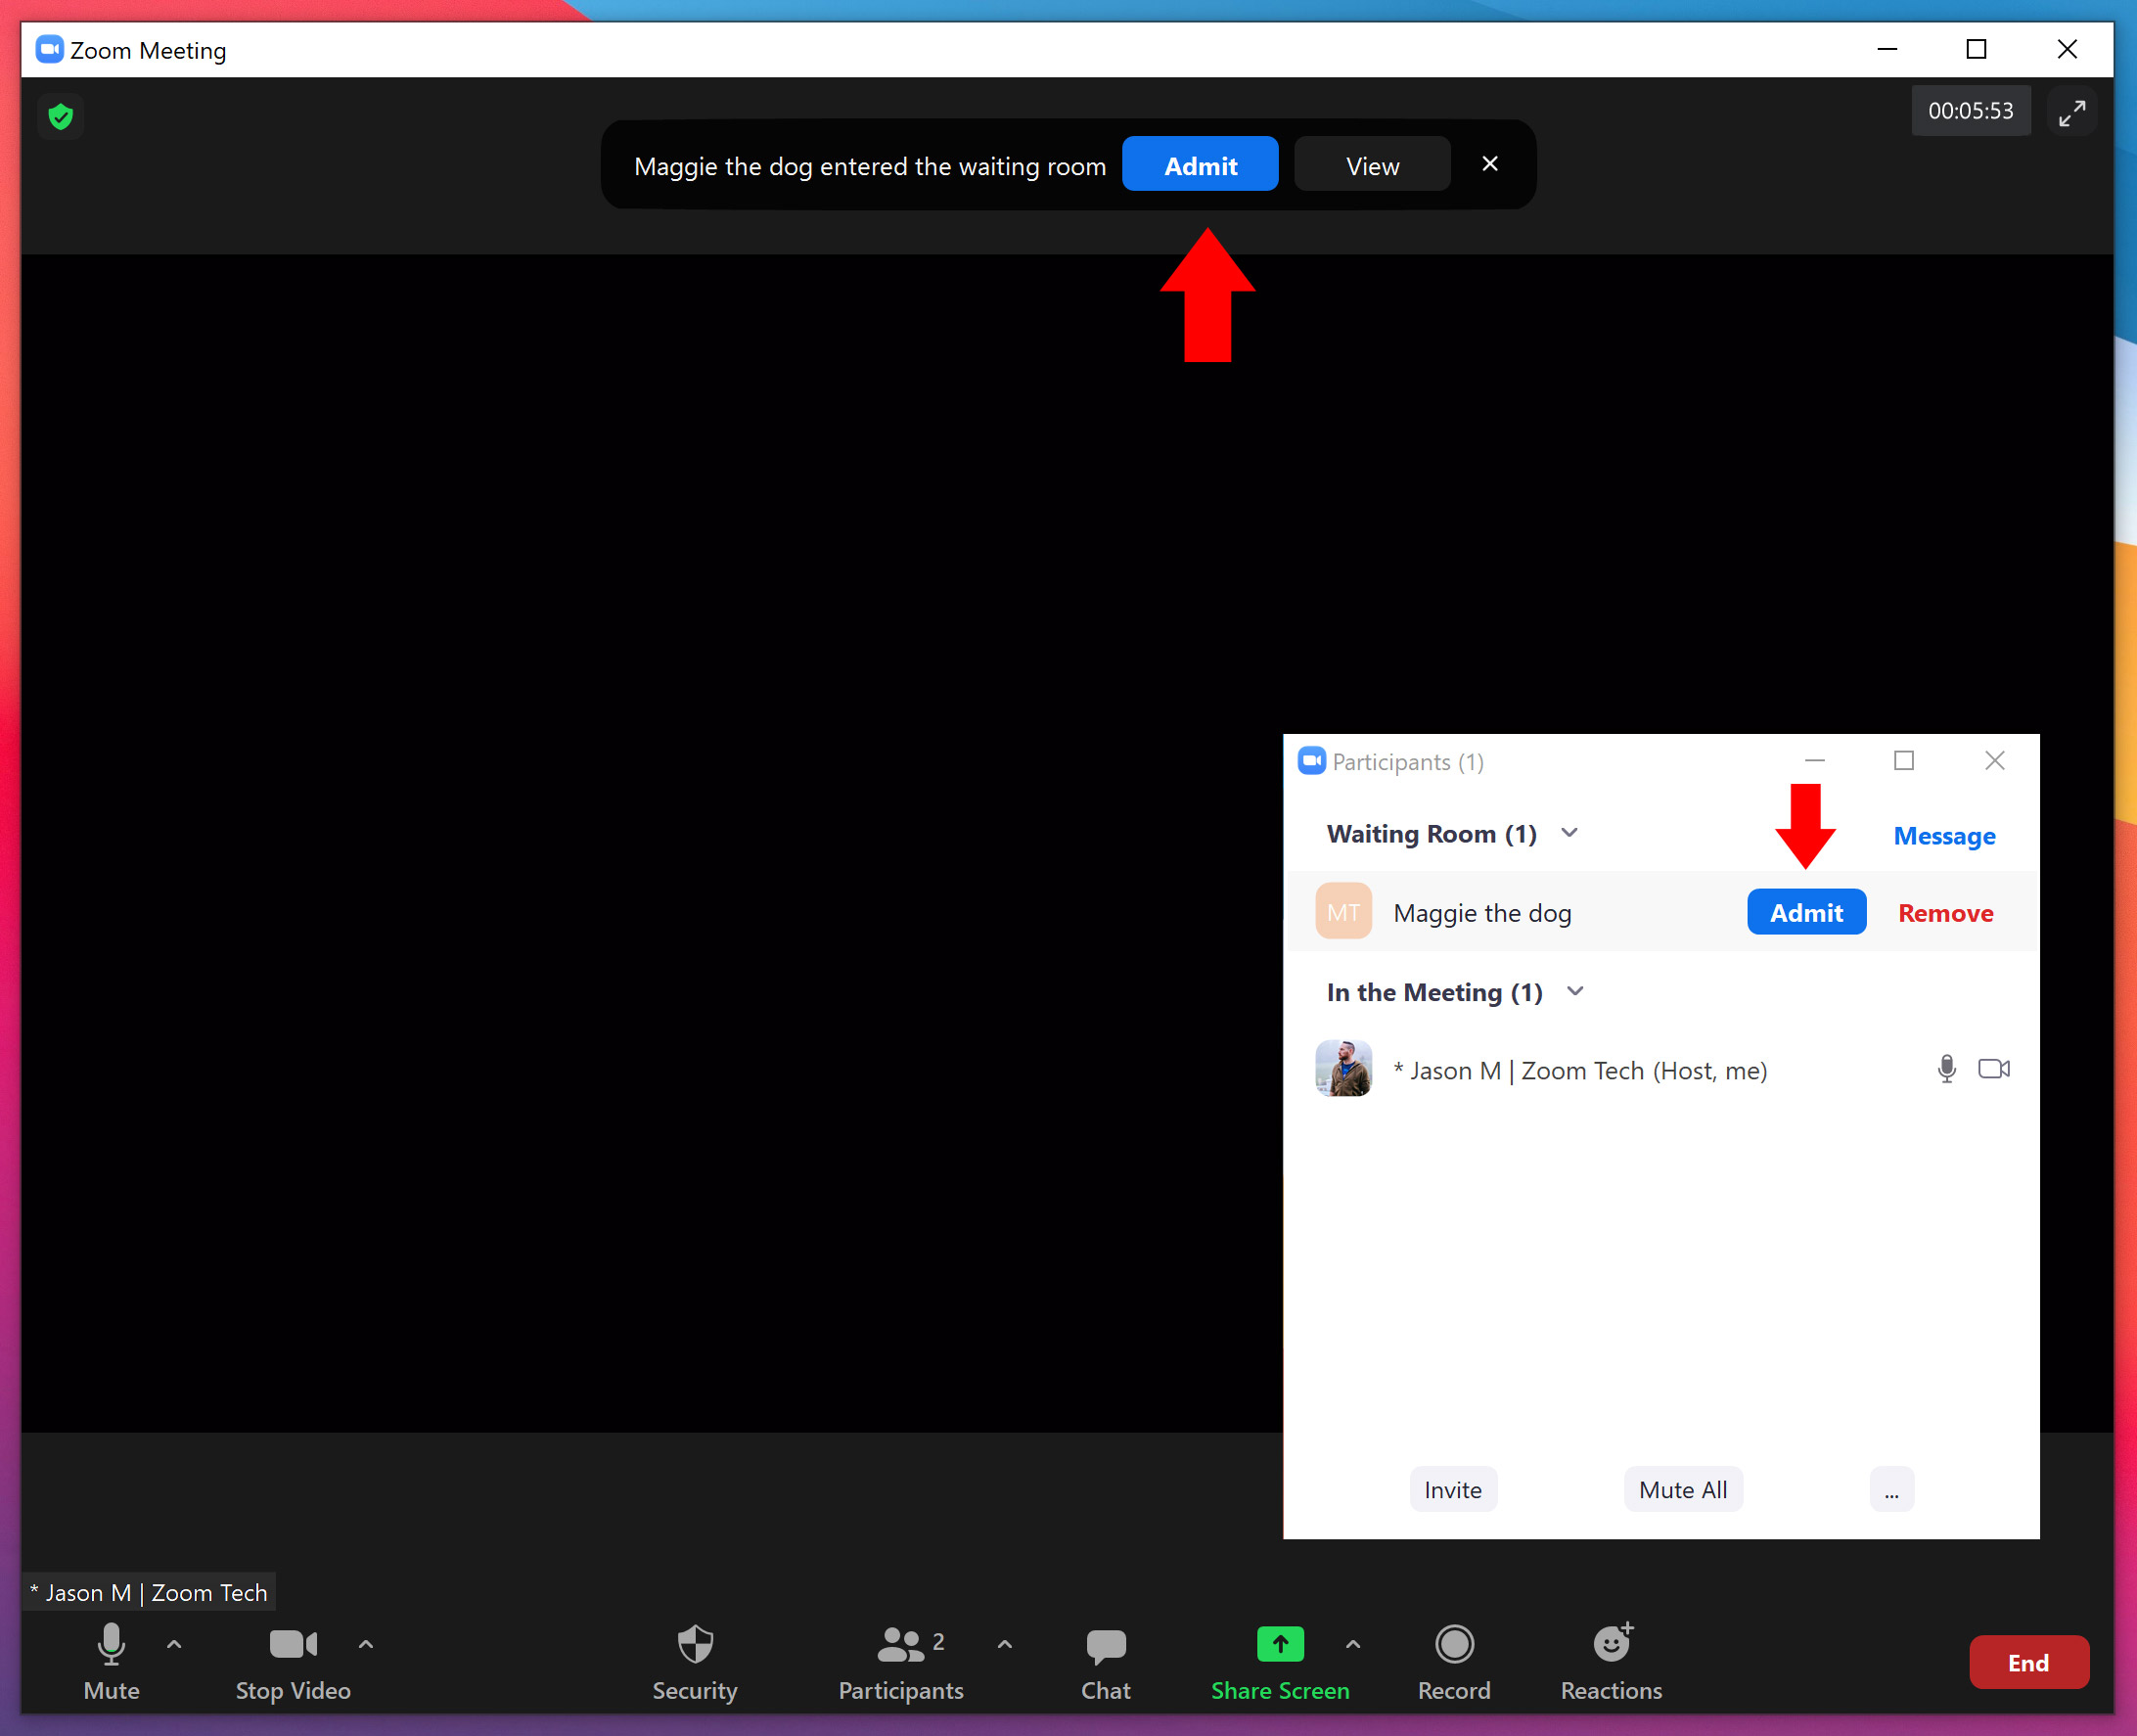
Be on the lookout for potential Zoom bombers lurking in the waiting room. A tell-tale sign of a bomber is strange, generic names like “iPhone” or names that don’t look like they would be a real person’s first and last name. Also, profile pictures of bombers tend to be cartoons or odd pictures. Bombers often come in swarms so if a ton of new people that you haven’t seen before suddenly arrive in your waiting room, be cautious. Let them sit in the waiting room for a while and see if they eventually leave. If they stick around, admit them one at a time and keep an eye on the gallery view for potential fowl play.
After running Zoom Tech for a while, you will start to be familiar with the regular attenders to the meeting and it will get easier spotting potential bombers. While we want to protect the group, we also want to allow newcomers into the meeting with little hassle. Sometimes these newcomers have strange screen names or pictures so it’s hard to tell who is legit and who is not. You always have the option of striking up a conversation with these individuals while they are in the waiting room by using the chat window and sending a chat to the waiting room only. See the Participants and Chat Windows section for more details.
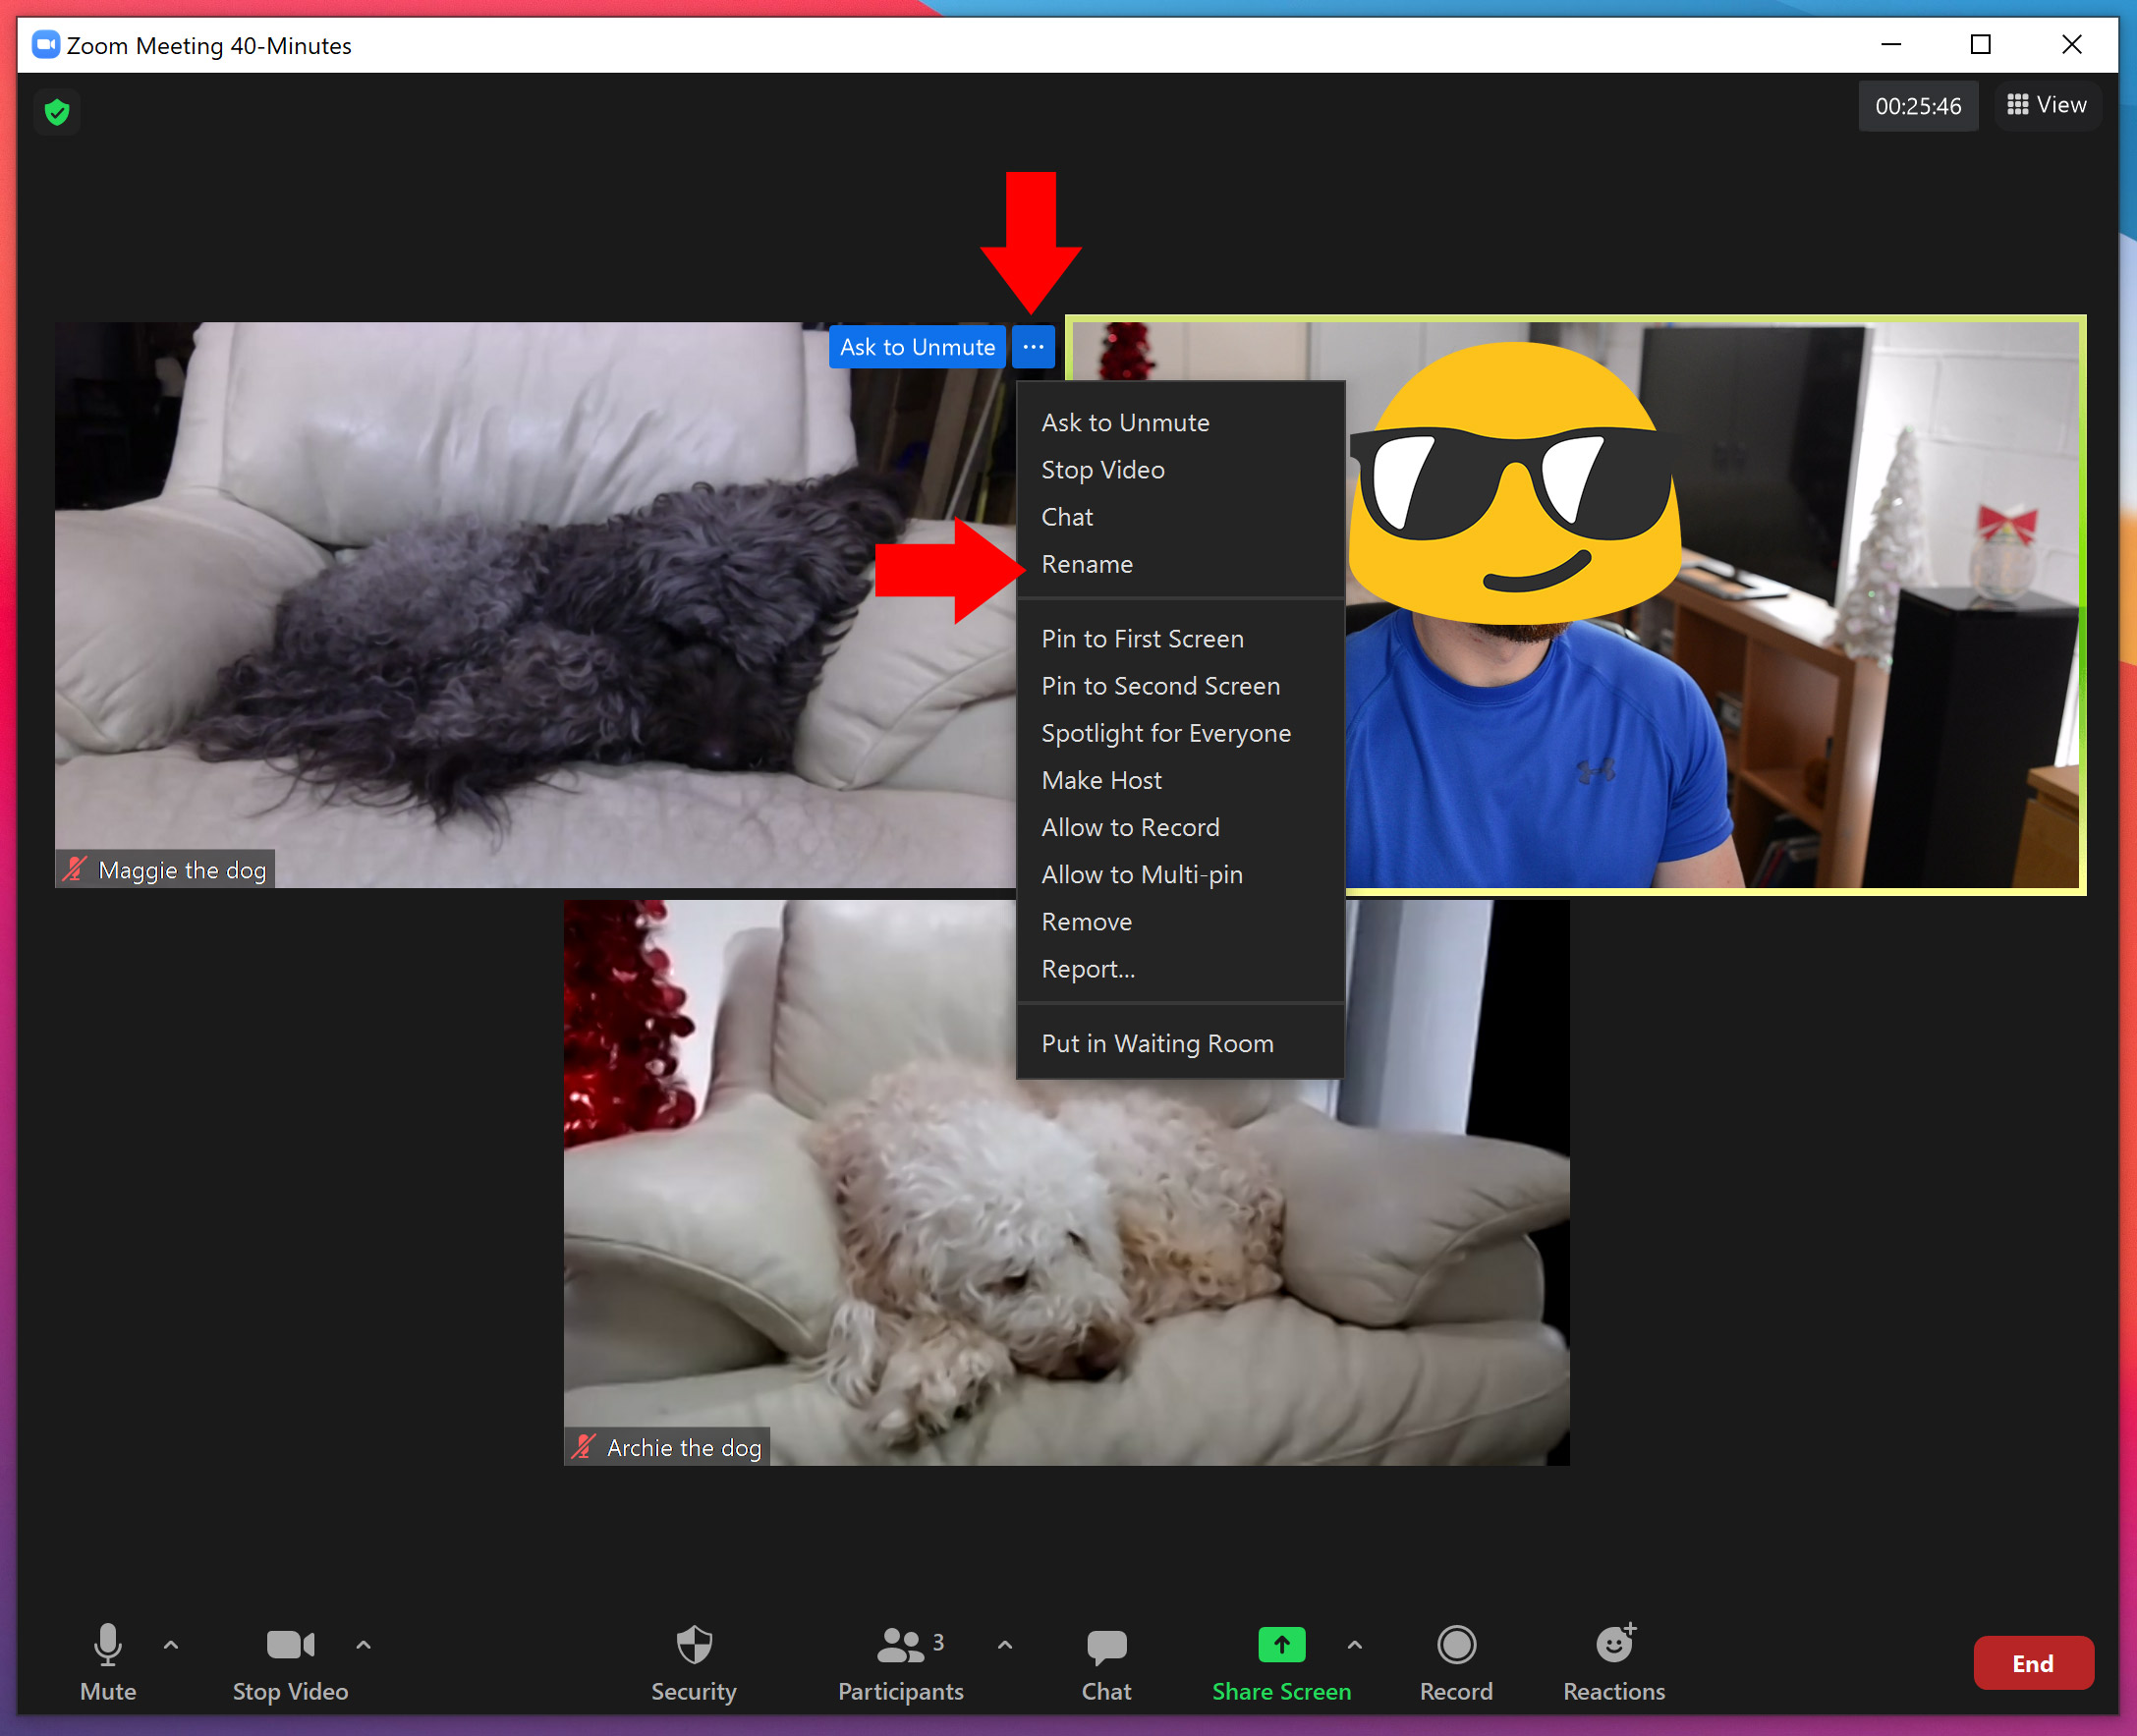
If you need to remove a user from the meeting at any time, click the ellipses … button on their video in the gallery window and on the menu select Remove. Be aware, this will prevent the user from gaining access to the room in the future.
For step by step instructions on how to deal with a Zoom bombing, see our Zoom Bombing Procedures page.
While this is definitely a style preference and is not necessary to follow exactly or at all, I do find that when all the trusted servants in the room are properly and consistently labeled, it makes it easier for participants to recognize who is serving incase they need to reach out. Online meetings already have a disconnected air to them so I like to make it as simple and obvious as possible to foster an environment of safety and comfort.
When renaming various trusted servants, I prefer to do the following:
Begin with an asterisks followed by a space, the first name of the person, their last initial, a vertical bar | and finally their service position title. Beginning with the asterisks helps guests in the meeting quickly identify who the trusted servants are when looking in the participants window, chat window drop-down, and in the gallery view. The vertical bar for those not familiar can be typed by pressing SHIFT + \ which is the key directly above the RETURN key. Finally, I believe it is the Zoom Tech’s responsibility to rename all trusted servants as they enter the room. Again, this is all personal preference but I find it helps the meeting be consistent and cohesive. To rename a guest, hover your mouse over the guest’s video square in Gallery view and click the ellipses … button. A menu will appear and contain a Rename function. Enter the name in the popup box and click Rename. You may also do this in the Participants window.
There are several key functions that can be performed in both the Participants windows and the Chat window. The Participants window as we saw in a previous section lists everyone in the waiting room and every one admitted to the meeting including co-hosts. Beside their names you will see a microphone and camera icon. When someone is speaking, the microphone icon will animate letting you know they are unmuted and making noise. This will move them to the top of the list so it’s easy to see who is unmuted at any given time.
When people raise their hands, hand icons appear beside their name as well as other Reactions such as Yes or No if voting is occurring. When a hand is raised, it is the Zoom Tech’s job to lower the hand once they are finished sharing. This is very important as it keeps their video focused for our mobile users until they are done.
At the bottom of the Participants window there is an ellipses … button that provides a drop-down menu with various functions. Some of these functions are also available in the Security menu as well. There is a Mute All button as well which enables the host to mute everyone in the meeting all at once except the host.

The Chat window also features an ellipses … button that provides a contextual menu for chat functions. It allows the Zoom Tech to disable the chat or restrict it. The default setting is “Everyone Publicly and Directly” which allows private messaging as well as public messaging.
To have conversations with those in the Waiting Room before you admit them to the meeting, simply click the “Everyone” button and select “Everyone in the Waiting Room” then begin your chat. People already admitted to the meeting will not see your conversations, only those in the waiting room.

Zoom’s screen sharing functionality is very dynamic and allows the Zoom Tech to be selective on what they share with the meeting. In the spirit of mitigating risk and potential distractions, I choose to share only a browser window containing the meeting documents so no one sees my desktop or taskbar etc. As Zoom Tech, our goal is to be as transparent as possible and keep the focus on the document we are sharing.
You do have the option to share the entire screen if you so choose, which will expose the meeting to everything you are seeing except for the Zoom control bar which only you see. In the image below, I have 3 screens attached to my PC so all three display as share options and then all my open windows display below that.
To begin a Screen Share, simply click the green Share Screen icon at the bottom of your gallery window and a dialog box will appear prompting you to choose what you would like to share. Make a selection and then click Share. If you have a lot of windows open at once on your computer it might be difficult locating the correct one from the list. If in doubt, in the interest of time, share your whole screen.

Once the screen share begins, Zoom shifts into screen sharing mode which hides the gallery view and brings the shared object to the front. Whatever is shared will have a green box around which indicates to you, the host, what will be shown to the meeting. A control bar will also be attached to the top of the screen and it will contain the familiar buttons and control functions from Gallery mode such as Mute, Start/Stop Video, Security etc.
Please note that when we are moving objects around the screen share such as scrolling up and down a document for reading, there is usually a lot of frame dropping or stutter on the guest’s-end and it can be hard to follow. Make slow, predictable movements when scrolling to mitigate this problem.
To stop the share, simply locate the red Stop Share button on the control bar and the share will end.

To present the meeting documents in a simple and orderly fashion, we’ve found the easiest method is to open all of the documents (which are typically in PDF format) in a tabbed web browser like Google Chrome and have the tabs laid out in the order in which each will be read. That way you simply have to click on the next tab to display the next document. This works really well when using the window-only Screen Share function as it treats tabbed browser windows as single windows.
For meeting documents, see our Documents and Resources page. Simply download each in a new tab on your browser and you are set to go!
Keep in mind that you will want to enlarge certain readings with smaller text so that participants in the meeting can read comfortably. Google Chrome offers this functionality by pressing CTRL + or – on Windows and Command + or – on macOS.
As a host, when you end a meeting it automatically ends for everyone still connected. I try and be careful not to do this prematurely however, it can be useful if the meeting gets taken over by bombers for example. We do have new methods of dealing with bombers thanks to updates to the Zoom application so ending a meeting abruptly is considered not best practice at this point.
You can however assign host privileges to someone else in the meeting which transfers hosting to that individual. After the transfer is made, you can leave the meeting as a regular guest at-will.
To end a meeting simply click the red End Meeting button at the lower right-hand corner of the gallery window and then confirm.
To transfer hosting privileges to another person in the room, hover over their video in the grid, click the ellipses … button and then select Make Host from the menu. You can also make someone a Co-Host this way as well. Co-Hosts have similar privileges as a host however, the Host ultimately controls all functions of the meeting environment.
0.2.2
0.2.1
0.2.0